-
E-mail
jtkhyq@126.com
-
Phone
13814782169
-
Address
No. 98 Jinsheng East Road, Jintan Economic Development Zone
Product Categories
Jintan District Antou Kehui Instrument Factory
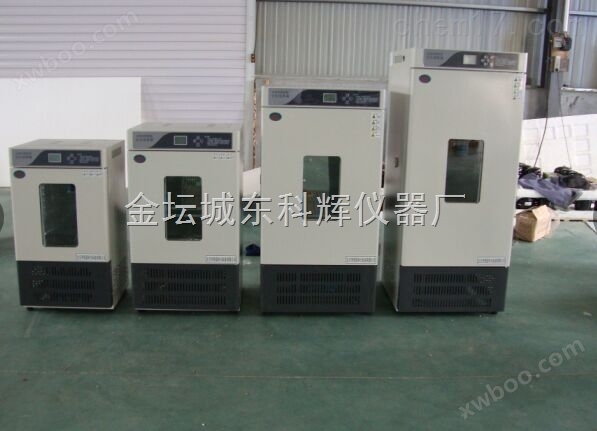
Biochemical Incubator
NegotiableUpdate on 01/22
- Model
- Nature of the Manufacturer
- Producers
- Product Category
- Place of Origin
Overview
Biochemical incubators are suitable for scientific research institutions and production departments such as environmental protection, health and epidemic prevention, drug supervision, agriculture and animal husbandry, and aquaculture. They are constant temperature equipment for water analysis and BOD determination, cultivation, preservation, plant cultivation, and breeding experiments of bacteria, molds, and microorganisms. Green and environmentally friendly 34a refrigerant.
Product Details
1、 Overview of coatings for biochemical incubators:
This product is suitable for scientific research institutions and production departments such as environmental protection, health and epidemic prevention, drug supervision, agriculture and animal husbandry, and aquaculture. It is a constant temperature equipment for water analysis and BOD determination, cultivation, preservation, plant cultivation, and breeding experiments of bacteria, molds, and microorganisms. Green and environmentally friendly 34a refrigerant.
2、 Characteristics of biochemical culture structure:
This product has a vertical structure, and the outer shell is made of high-quality cold-rolled steel plate with surface electrostatic spraying. The studio is made of mirrored stainless steel plates. The temperature control system adopts a microcomputer chip processor PID control method, with precise temperature control and time setting function. The box door is equipped with a vacuum tempered glass observation window, which allows for a wider view of the items inside the studio through the observation window and lighting device. *The air supply system makes the temperature more uniform. The left side of the box is equipped with a Ø 30 test hole for user inspection and external connection of built-in equipment leads.
3、 Biochemical cultivation environment
1. Power supply AC220V 50Hz;
2. Environmental temperature: 5 ℃ -35 ℃ (when the set temperature is ≤ 10 ℃, the environmental temperature is ≤ 28 ℃);
3. Relative humidity ≤ 80%;
4. There should be no strong vibrations or corrosive gases around the instrument;
5. The instrument should avoid direct sunlight and the influence of other cold and heat sources;
6. The instrument should be placed horizontally with at least 20 centimeters of clearance around it;
7. The instrument should be kept indoors with good ventilation and no severe dust.
4、 Biochemical cultivation technology parameters
Product Model |
SPX-80 (Biochemistry) MJX-80 (mold) |
SPX-150 (Biochemical) MJX-150 (mold) |
SPX-250 (Biochemical) MJX-250 (mold) |
rated voltage |
220v 50Hz |
||
Temperature control range |
0~60℃ |
||
temperature control accuracy |
±1℃ |
||
working volume |
80L |
150L |
250L |
input power |
800W |
900W |
1000W |
Studio size (depth * width * height mm) |
450*350*500 |
500*400*730 |
500*500*950 |
Dimensions (Depth * Width * Height mm) |
558*618*1160 |
638*618*1410 |
778*618*1600 |
a、 Internal parameter list
Long press the setting button for about 3 seconds, and the password prompt "LC" will appear. Use the up/down keys to change the password to "3", click the setting button, and enter the internal parameter setting state. Click the setting button to modify various parameters, then press and hold the setting button for 3 seconds to exit this state, and the parameters will be automatically saved. If no key is pressed within 30 seconds, it will automatically exit this state and the current parameters will not be saved.
Parameter prompt |
parameter name |
Parameter Function Description |
parameter range |
factory parameters |
Lc- |
combination lock |
When Lc=3, various parameters can be viewed and modified |
0~999 |
0 |
P- |
Proportional band |
Adjustment of time proportion effect. Reducing P can accelerate heating output, while increasing P can reduce overshoot |
2.0~25.0 |
15.0 |
AL- |
overtemperature Deviation Alarm |
When PV ≥ SP+AL, the buzzer sounds and there is a cooling output |
0.0~20.0 |
3.0℃ |
cT- |
compressor startup delay |
Compressor delay protection time, with two startup times ≥ CT minutes |
0.0~10.0 minutes |
3 minutes |
Pb- |
Zero position adjustment |
Sensor zero position error correction. Pb=actual temperature value - instrument measurement value |
-9.9~9.9 |
0.0 |
PK- |
Full adjustment |
Sensor full-scale error correction PK=1000 * (actual temperature value - instrument measurement value)/instrument measurement value |
-999~999 |
0 |
Note: 1. In order to achieve the desired control effect, P can be modified appropriately (usually within the range of "10.0-20.0"), but usually no modification is required and the factory parameters can be used directly.
2. When there is a deviation in the temperature measurement value, it is usually sufficient to modify Pb without modifying PK.
3. The default parameters of this instrument cannot be modified unless there are significant requirements.
Check the ambient temperature
Long press the setting button for about 3 seconds, and the password prompt "LC" will appear. Use the up/down keys to change the password to "18", click the setting button to enter the view of the ambient temperature status, and then click the setting button to exit this state. If no key is pressed within 30 seconds, it will automatically exit this state and the current parameters will not be saved.
Parameter indication |
parameter name |
Parameter Function Description |
(Scope) Factory parameters |
LC- |
password |
When LC=18, reference can be made to the ambient temperature |
|
Hd- |
ambient temperature |
|
|
b、 Compressor working mode and defrosting related parameters
Long press the setting key for about 3 seconds, and the password prompt "LC" will appear. Use the add/subtract keys to change the password to "123",
Click the setting button to enter the compressor working mode and defrosting parameter status. Click the setting button to modify various parameters, then press and hold the setting button for 3 seconds to exit this state, and the parameters will be automatically saved. If no key is pressed within 30 seconds, it will automatically exit this state and the current parameters will not be saved.
Parameter indication |
Parameter Function Description |
(Scope) Factory parameters |
LC- |
When LC=123, parameter values can be viewed and modified |
|
S-H |
When the "ambient temperature - S-H>temperature setting value", the compressor works normally in an open position; On the contrary, compressing into an open working mode |
(0.0~50.0)8.0 |
dt1 |
The defrosting time interval when the temperature setting value is ≤ 8.0 ℃ |
(0-200 hours) 24 hours |
HS1- |
When the temperature setting value is ≤ 8.0 ℃ The time from defrosting to stopping the compressor operation |
(120~600 seconds) 180 seconds |
tt1- |
When the temperature setting value is ≤ 8.0 ℃ Full power heating time during defrosting |
(0~HS1 seconds) 60 seconds |
dt2 |
When 8.0 ℃ < temperature setting value ≤ 15 ℃ Time interval for defrosting |
(0-200 hours) 48 hours |
HS2- |
When 8.0 ℃ < temperature setting value ≤ 15 ℃ The time from defrosting to stopping the compressor operation |
(120~600 seconds) 180 seconds |
tt2- |
When 8.0 ℃ < temperature setting value ≤ 15 ℃ Full power heating time during defrosting |
(0~HS2 seconds) 60 seconds |
Note: 1. The defrosting function is only available when the compressor is operating normally, while the defrosting function is not available when the compressor is operating in a disconnected state.
2. When dt1=0, it means that even when the compressor is normally open, there is no defrosting when the temperature setting value is ≤ 8.0.
3. When dt2=0, it means that even when the compressor is normally open, there is no defrosting when "8.0 ℃ < temperature setting ≤ 15 ℃";
Notes:
A、 Compressor control mode
1. The instrument will automatically determine the working mode of the compressor after a 30 second power on delay. If the set value changes by no more than 3.0 ℃, the compressor will maintain its original working mode.
2. When the temperature setting value changes by more than 3.0 ℃, the controller will automatically determine how to operate. If the setting value changes by no more than 3.0 ℃, the compressor will maintain its original operating mode.
3. When the setting value of "S-H" changes, the controller must be powered on again for the "S-H" parameter to take effect.
B、 alarm function
When the controller is powered on * times or the temperature setting value decreases, even if "PV ≥ SP+AL", the alarm light does not light up and the buzzer does not sound.
C、 Temperature fault
If the temperature measurement value displays "0000", it indicates a temperature fault. Please check the sensor first. If the sensor is *, the controller is faulty.
5、 Panel layout and description
1. Outline drawing

2. Operation panel


6、 Usage method
1. Preparation before use
A、 Environmental temperature: 5-35 ℃; Relative humidity not exceeding 80%;
B、 There is no strong vibration source or strong electromagnetic field around;
C、 It should be placed indoors in a stable, level, and free from severe dust, direct sunlight, and corrosive gases;
D、 Adequate space gap (over 50 centimeters) should be reserved around the product;
E、 Product power supply voltage 220V 50Hz;
F、 Reasonably place and adjust the position and quantity of shelves. Items placed in the studio must be kept with a certain gap around to avoid air circulation obstruction.
2. Power on after startup
A、 Turn on the power switch, and the machine enters the running state after a self check process of about 4 seconds: the left screen (PV) displays the measured temperature, and the right screen (SV) displays the set temperature. The circulating fan is running and a whistling sound can be heard.
B、 Temperature setting and time setting
Press the "Set" button in the running state to enter the temperature setting state. The setting indicator light will turn on, the left screen will display SP, and the individual digits on the right screen will flash. At this time, the flashing position can be changed by using the shift key, and the flashing position value can be modified by using the up/down key. After the modification is completed, press the setting button again to confirm and enter the time setting state: the left screen displays ST, and the individual digits on the right screen flash (the operation method is the same as the temperature setting method). After the modification is completed, press the setting button to confirm and return to the running mode (timing is in minutes, if no time setting is needed, set ST to "0" and the machine will continue to work).
3. Application example: Temperature 30 ℃, constant temperature time 60 minutes
Click the setting button to enter the temperature setting state. Left screen: SP displayed, right screen digit flashing: press the up/down key to change the value to 30. Press the setting button again, the left screen will display ST, and the individual digits on the right screen will flash. Press the up/down button to change the value to 60. Press the setting button again to store data and exit the temperature and time setting state.
After running, the buzzer will sound for 30 seconds. Press and hold the decrease button for 4 seconds to restart the program. When the buzzer sounds, press any key to silence it.
7、 Temperature calibration
When the temperature displayed on the instrument does not match the measured temperature (measured after 2 hours of constant temperature on the machine), the following method can be used to calibrate the temperature: long press the setting button for about 3 seconds, LC will appear on the left screen, use the increase and decrease buttons to modify the value on the right screen to 3, and then click the setting button to enter the internal parameter state of the machine. Press the set button one by one to switch the internal parameters to Pb, and then modify their parameter values: Pb=actual temperature value - instrument measurement value (the adjustment process can refer to the "Internal Parameter List"). After modification, press and hold the setting key to return to the running state.
8、 Precautions for use
A、 Precautions before use:
1. Please read the product manual carefully before use and try the machine again.
2. Before use, please confirm that the power supply voltage meets the product requirements and use an independent power outlet.
3. This product must be reliably grounded (neutral or neutral wires must not be used as grounding wires).
4. Newly purchased machines must be placed horizontally for 24 hours before attempting to operate again to eliminate potential damage to the compressor caused by transportation bumps.
5. When restoring the use of this device, it should be left idle for a period of time before placing the test sample for cultivation.
B、 Precautions during use
1. The fan must be kept running when starting up.
2. The test sample should be placed on the shelf and should not be too dense or overloaded to avoid affecting air circulation.
3. When there is an alarm prompt, it must be eliminated and forced startup is not allowed.
4. When the temperature inside the box is ≥ 50 ℃, do not set the low temperature (below 10 ℃) to avoid damage to components such as compressors and electric heating tubes.
5. Before using low temperature, the machine should be dried at 45 ℃ for at least 1 hour.
6. When the left testing hole (humidification port) of the instrument passes through the equipment lead, please do a good job of insulation treatment.
7. The experimental environment temperature is ≥ 32 ℃ or the temperature used inside the box is ≥ 50 ℃. It is strictly prohibited to set low temperatures (below 10 ℃).
8. It is strictly prohibited to conduct experiments on flammable, explosive, and corrosive materials.
9. Any parameter modification during normal use must be confirmed by pressing the setting key, otherwise the modification will be invalid.
10. When using this product, a dedicated person must be responsible for supervision. After use, the external power supply must be cut off to prevent accidents.
C、 Precautions for Maintenance and Repair
1. To ensure the normal operation of the machine, it is necessary to regularly check whether the electrical connectors are well connected, whether the electrical components are working properly, and whether the instrument control is accurate.
2. The inside and outside of the machine should be kept clean regularly. If corrosive liquids splash in, they should be cleaned in a timely manner to prevent corrosion of the box.
3. When stopping use, the machine must be cleaned both inside and outside, and dust prevention measures must be taken.
4. It is not allowed to plug in or unplug the power plug of the machine without turning off the power switch during operation.
5. Non professionals are not allowed to disassemble and repair.
6. If any of the following situations occur, the power plug must be unplugged:
A、 When replacing the fuse.
B、 When the machine malfunctions and needs to be inspected and repaired.
C、 When the machine is not in use for a long time.
D、 When moving the machine.
9、 Fault analysis and troubleshooting
Fault phenomenon |
Root cause analysis |
exclusion method |
The power switch light is not on |
No power supply |
Check the socket |
Insurance is bad |
Change insurance |
|
The dashboard displays "0000" |
Sensor malfunction |
Replace the sensor |
The control board is broken |
Environmental control board |
|
Frost formation on the evaporator or inner liner |
Regularly open the door when setting low temperature |
Drying at 45 ℃ and reducing the number of door openings |
The lead hole is not tightly sealed |
Plug the inner hole with a rubber stopper |
|
The box door is not tightly closed |
Close the box door tightly |
|
There is a strange noise when starting up |
Loose circulating fan blades |
Adjust the position of the fan blades |
Loose condenser, compressor or fan |
Adjust and tighten |
|
Uniformity difference |
Excessive placement of test samples |
Reduce the number of test samples |
The evaporator frosting air duct is obstructed |
Retest the drying box |
|
The temperature doesn't go up |
The temperature setting is too low |
Adjust the set temperature |
The instrument has no output |
Replace the instrument panel |
|
Heating tube is broken |
Replace the heating tube |
|
The circulating fan does not rotate |
ventilator |
|
The temperature sensor is broken |
Replace the sensor |
|
The temperature cannot be lowered |
Control board cooling has no output |
Replace the control board |
Compressor thermal protection |
Check the power overheat protector |
|
Evaporator frosting |
Re test after drying the box |
|
The ambient temperature is too high |
Reduce the ambient temperature |
|
Lack of refrigerant |
Supplement refrigerant |
|
Ice blockage in refrigeration system |
Evacuate and recharge the refrigeration unit again |
10、 Product wiring diagram


11、 Packing list
serial number |
category |
name |
unit |
quantity |
1 |
machine |
Biochemical (fungal) incubator |
Taiwan |
1 |
2 |
document |
Instruction Manual |
this |
1 |
3 |
document |
Certificate of Conformity/Warranty Card |
Zhang |
1 |
4 |
spare parts |
shelf |
a |
2 |
5 |
spare parts |
fuse |
a |
2 |
Similar Product Recommend